- Send us over a vector file in Coreldraw .cdr, otherwise an .eps, .dxf 2004 version preferable
- Make sure you verify the size of your drawing in mm
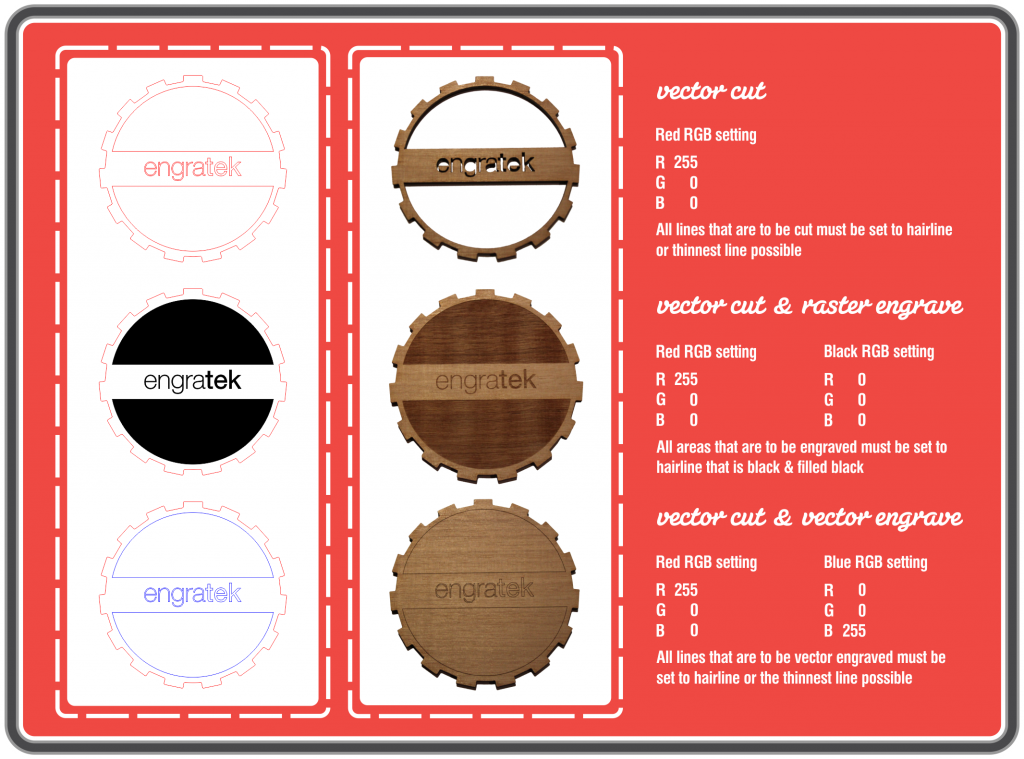
- Red strokes for laser cutting
- Black strokes for raster engraving
- Blue strokes for vector engraving / scoring
- Grey scale Image files for engraving sent as .jpeg, .tiff or .png.
- Choose a unique name for your file – something like “Sydneycity_council_01.dxf”
Need Some More Advice?
These drawing guidelines for laser cutting will give you some thorough answers on setting up a laser ready file. You will need to use a CAD software to compile your drawing. Everything needs to be in vectors meaning files can’t be created in image editing software such as adobe photoshop.
If you don’t have Corel draw to create your vector file but would like to make your own you can use other programs like Adobe Illustrator, Inkscape or Vector Designer to create your file – there are lots of tutorials on the internet to show you how to use these programs.
You can also use an online service like Vector Magic to convert your file to a vector – these work best with clear bold lines (not pencil drawings) of if you draw up your design in black ink and then upload to this website then it might be able to convert if for you. They can even hand trace your design for you if the auto trace does not work so well.
Preparing your file
Create a boundary box for your drawing. The size of this is up to you and is dependent on your material size you would like to cut or engrave.
Make sure everything fits within the size of our machine bed. The limits of our engraving are slightly smaller than the limits that our machine can cut due to technical reasons, So just make sure your drawings fit to our parameters.
- Raster Engraving – 860mm x 610mm
- Vector Cutting & Engraving – 910mm x 610mm
Also make sure that your components don’t go right to the edge of the boundary box. Allow for at least a 2mm border around the outside.
We can accommodate for longer pieces that might need to be engraved as our machine has a pass through feature on the front and back aswell, so any creative ideas you have its best you contact us so we can figure out a solution.
Laser cutting vector lines
For everything you would like to have laser cut draw out your vector strokes in:
Red Hairline
Line weight: Hairline
Nesting: If compiling a file with lots of components on one sheet of material make sure there is a gap of at least 2mm between the components. They can go closer if required but this is the safe option.
Saving cutouts: If you need the cutouts that fall out from your main parts, Let us know (we’ll save them anyway, but best to give us a heads up just to make sure.
Small details: should be not too tiny! As a general rule of thumb, drafting parts that are no smaller than the thickness of your material will be safe. We can go smaller but these parts are likely to be very fragile. The material tolerance photographs give an indication of how fine we can cut on each material.
Vector engraving lines
To mark the surface of the material with vector strokes make sure they are in:
Blue hairline
Line weight: Hairline
(You can tell us how heavy you would like these marks made when you send your files. As a standard we use a medium marking.)
Raster engraving strokes
Strokes: To raster engrave vector strokes make sure they are:
Black strokes
Line weight: anything above 0.03mm
Engraving depth You can tell us how heavy you would like these marks made when you send your files. The materials gallery shows 3 raster engraving depths as a standard for each material to get a better understanding.
If want your engraving to be clearly visible, we recommend that you allow us to select the appropriate engraving depth (usually fairly shallow, just marking the surface of the plastic.
Raster engraving fills
Black hairline with black fill
Filled objects: Make sure all vector fills are also in Black.
(you can tell us how heavy you would like these marks made when you send your files. As a standard we use a medium marking.)
Engraving depth You can tell us how heavy you would like these marks made when you send your files. The materials gallery shows 3 raster engraving depths as a standard for each material to get a better understanding.
If want your engraving to be clearly visible, we recommend that you allow us to select the appropriate engraving depth (usually fairly shallow, just marking the surface of the plastic.
Need more depth?
If you must have particular depths, please let us know the roughly what this is. We will try our best to achieve the depths you specify by adpating with the laser speed and power, but we cannot guarantee a particular accuracy. Raster and vector engraving are best for making cosmetic markings and are not suitable for making mechanical grooves and features with precise depths.
Photo engraving
Obtaining the right image to engrave successfully can be tricky.
Your image must be at least 300dpi. Images can be sent separately or placed into your vector file.
Please ensure they are in Grayscale. Images that engrave well typically contain high levels of contrast.
3D engraving
You can use images and vector fills for 3D engraving.
In both cases artwork with a High contrasts / multiple shades of grey scale give the best results.
Compound engraving
Note: Compound engraving is for hard materials only and can’t be used in combination with any other processes.
You can use images and vector fills for compound engraving. In both cases your artwork should be 100% black and white The compound which marks the material only reacts to artwork that is black.
Using text
All text used needs to be Outlined / converted to paths. This is to preserve your font, as we might not have your font in our font database.
The middle islands of some letters will fall out when laser cut which can make the text difficult to read. If you would like to prevent this one option is to use a stencil font.
Cleaning up your drawing
If adapting a drawing from a previous drawing format e.g. an architectural plan, make sure to delete stokes that do not relate to the items you would like laser cut or engraved.
Saving your file
Preferred file format Adobe Illustrator file (.ai), otherwise an.eps, .dxf or.dwg.Image files can also be sent as .jpeg, .tiff or .png.
If your drawing contains image files placed within the boundary box, make sure you tick the ‘Include Linked Files’ box before saving.
Choose a unique name for your file – something like “Sydneycity_council_01.dxf”
Send only one file for each material: The file should include one copy of each unique part with indications of how many of each you need, and the material from which they should be cut. This information can either be text in the file, or explained in the form when you upload your files.
Multiple files: If you need to send more than one file for a single design, you can submit them together on one document. But be sure to clearly explain what you would like us to do with each file when you send them over.
When you are ready Send your files for a quote


